Cargo 笔记 ongoing
文档官网 docs.rs 的搜索技巧
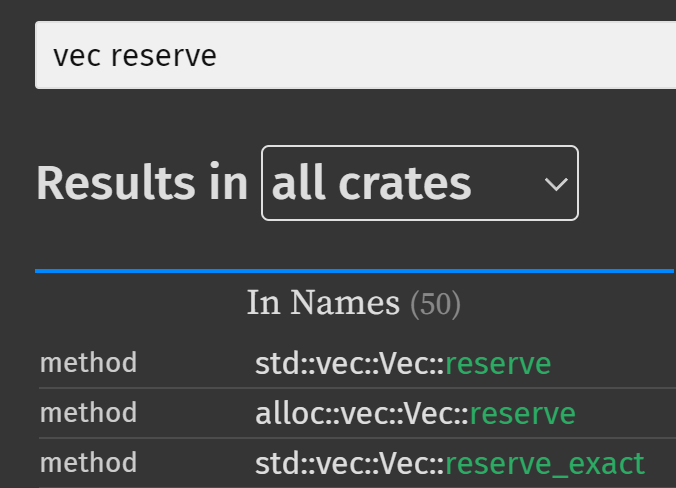
如果在搜索时, 希望包含 mod 或类型限定, 可以用空格将关键词分隔开.
例如希望搜索 std::vec::Vec::reserve(), 就可以输入关键词 vec reserve.
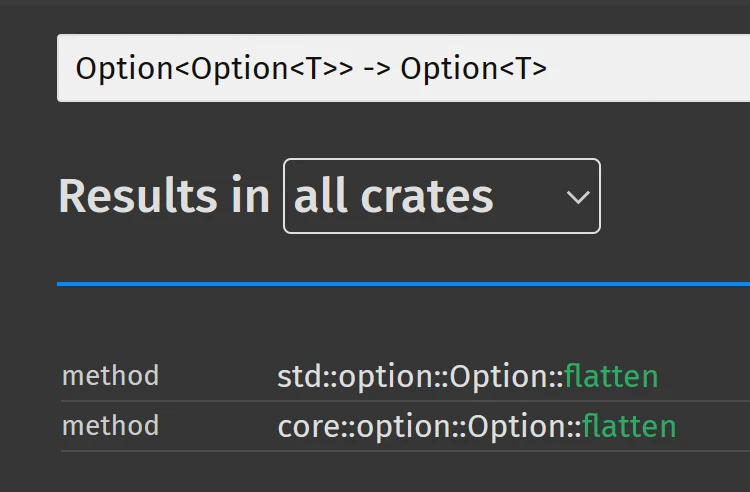
从 Rust 1.74.0 起, 文档搜索对于泛型的支持变得更好:
避免意外修改标准库或第三方 crate
WARNING
此方案仅适用于 VSCode.
通过 Ctrl+Shift+P 执行 Preferences: Open User Settings (JSON) 命令.
在打开的配置文件中, 添加以下内容:
"files.readonlyInclude": {
    // rust std and third party crates
    "**/.cargo/registry/**": true,
    "**/.rustup/**": true,
    "**/.cargo/git/**": true,
    "**/Cargo.lock": true,
}
更新所有来自 cargo install 的可执行程序
需要借助 cargo-update 工具.
# 安装 cargo-update
cargo install cargo-update
通过以下命令更新所有通过 cargo install 安装的可执行程序:
cargo install-update -a     # 短选项
cargo install-update --all  # 长选项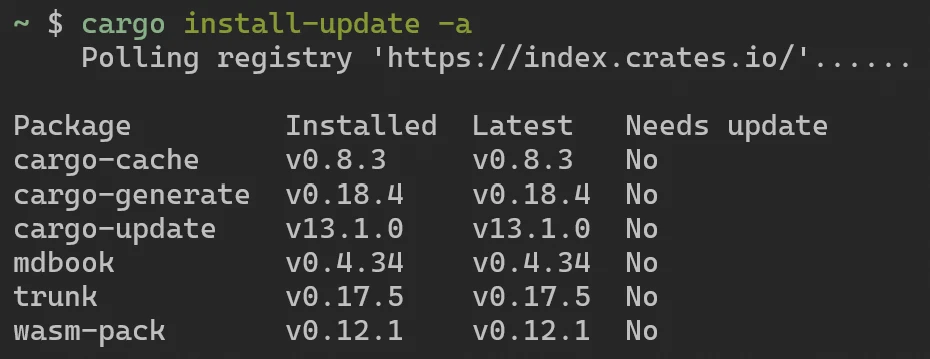
剪除编译产生的缓存
需要借助 cargo-cache 工具.
# 安装 cargo-cache
cargo install cargo-cache
通过以下命令剪除编译缓存:
cargo cache -a  # 短选项
cargo cache --autoclean  # 长选项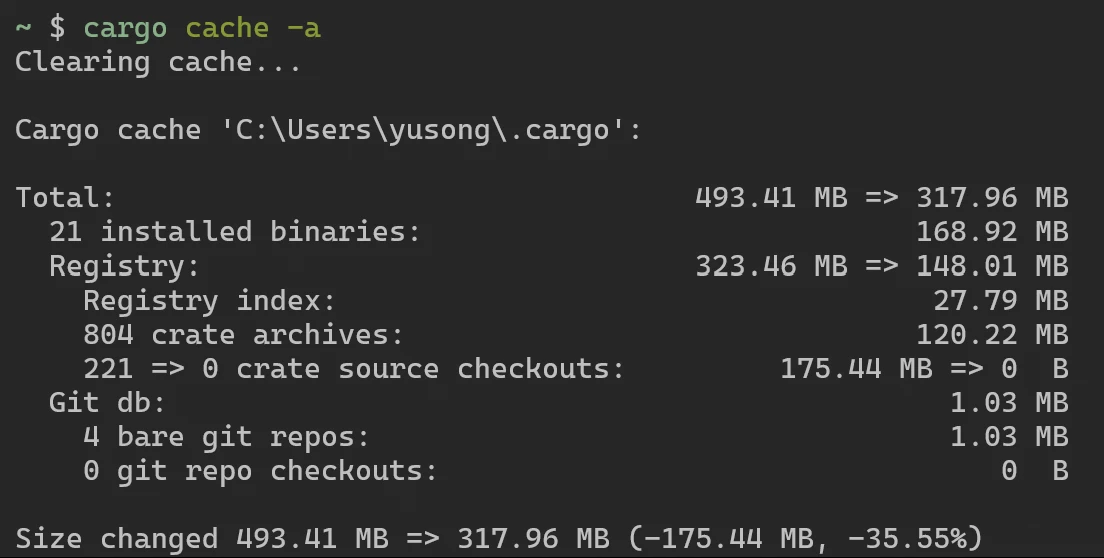
针对特定代码仓库的 Cargo 配置
写在代码仓库的 .cargo/config.toml 文件中.
与全局的 Cargo 配置文件路径 ~/.cargo/config.toml 很像.
为工程单独设置 Toolchain
详见 The rustup book: Overrides.
在 Cargo.toml 旁, 工程根目录下, 创建 rust-toolchain.toml 文件.
[toolchain]
# 可以通过 channel 指定 rust 编译器版本
channel = "nightly"
管理多个 toolchain 和 target
# 安装 rust nightly toolchain
rustup toolchain install nightly
# 将默认的 toolchain 设置为 nightly
rustup default nightly
WARNING
rustup target add [xxx] 时, 只会为当前默认的 toolchain 添加 target.
如果需要为某个指定的 toolchain 添加 target, 则需要使用 --toolchain 选项.
# 查看当前默认的 toolchain
rustup default
# 为 nightly toolchain 安装名为 wasm32-unknown-unknown 的 target
rustup target add wasm32-unknown-unknown --toolchain nightly
通过 clippy 禁止使用某些类型
在当前工程的根目录创建 clippy.toml 文件, 然后通过 disallowed-types 来禁用.
例如使用了 ahash 之后就没有必要再使用标准库中的 HashMap 和 HashSet,
此时可以通过 clippy 禁用标准库中的这两个类型, 以免误用.
# 可以使用 ahash  替代标准库中的 HashMap 和 HashSet, 以获得更好的性能.
disallowed-types = ["std::collections::HashMap", "std::collections::HashSet"]
默认情况下, 如果使用了 disallowed-types, 只会触发 warning.
如果想要在这种情况下触发 error, 则需要在 rust 代码中做如下配置:
// 为当前 crate 配置 clippy 规则
#![deny(clippy::disallowed_types)]
常用的 Cargo 默认环境变量
Cargo 默认提供一些环境变量, 详见 The Cargo Book - Environment Variables.
可以通过 CARGO_PKG_VERSION 得知程序的版本 (也就是写在 Cargo.toml 中的 version).
/// Program version.
const VERSION: &str = env!("CARGO_PKG_VERSION");
可以通过 CARGO_BIN_EXE_<name> 来获取编译产生的可执行文件的位置.
注意这个环境变量仅用于 integration tests 以及 benchmark.
// 假设 package name 为 my_program
const EXE_PATH: &str = env!("CARGO_BIN_EXE_my_program");
// 更推荐使用这种写法, 因为无需将 package name 硬编码
const EXE_PATH: &str = env!(concat!("CARGO_BIN_EXE_", env!("CARGO_PKG_NAME")));
借助 cargo-edit 更新 Cargo.toml
每当我们使用 cargo update 命令时, cargo 只会修改 Cargo.lock 文件.
由于 Semantic Versioning 机制, 我们无法更新至 "存在破坏性修改" 的新版本.
此时可以挨个手动更新依赖的 crate. 但如果觉得麻烦, 就可以借助 cargo-edit 一键更新.
# 安装 cargo-edit
cargo install cargo-edit
在 crate 的根目录执行以下命令:
# 一键更新所有依赖, 并确保升级过程中不包含破坏性修改
cargo upgrade
# 无视破坏性修改, 直接更新至最新
cargo upgrade --incompatible # 长选项
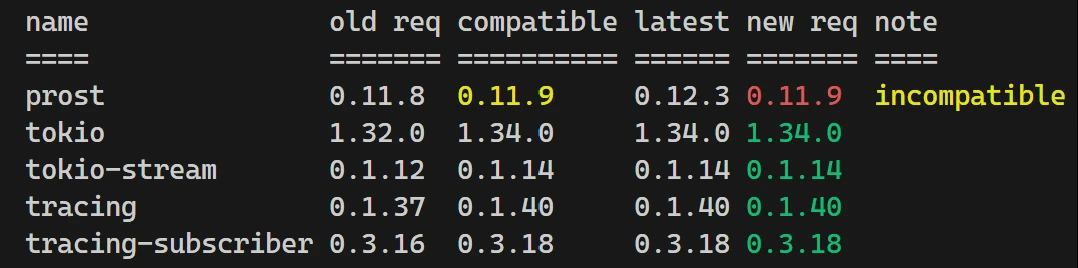
cargo upgrade -i # 短选项可以看到下图中的 prost 更新至了 0.11.9, 并未更新至最新的 0.12.3.
因为从原来的 0.11.8 更新至 0.11.9 时, 按照 Semantic Versioning, 不会包含破坏性修改.
此时如果想无视破坏性修改, 直接更新至最新版本, 则应使用 --incompatible 选项.
WARNING
首次 cargo upgrade 前需要先执行以下命令, 详见此 Issue.
# 执行此命令耗时可能较长, 大约有 600 MB 的数据需要下载.
CARGO_REGISTRIES_CRATES_IO_PROTOCOL=git cargo fetch
因为 cargo-edit 使用了 Rust 1.70.0 版本之前默认的 git protocol.
然而从 Rust 1.70.0 开始, cargo 默认使用 sparse protocol.
Rust 社区常用的开源许可
Rust 社区通常采用 MIT 和 Apache 2.0 双重许可.
INFO
双重许可 (dual-license) 表示用户可以选择遵循其中一种许可证来使用和分发该软件.
这种做法通常允许开发者更灵活地选择适合其需求的许可证.
在 Cargo.toml 中可以使用 package.license 字段来设置.
当 crate 上传至 crate.io 后, crate 主页所显示的 Metadata 中的 License 就由这个字段来指定.
[package]
# ...
license = "MIT OR Apache-2.0"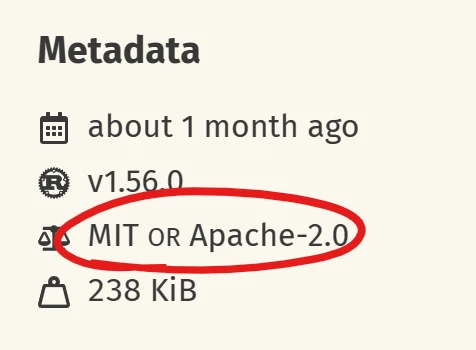
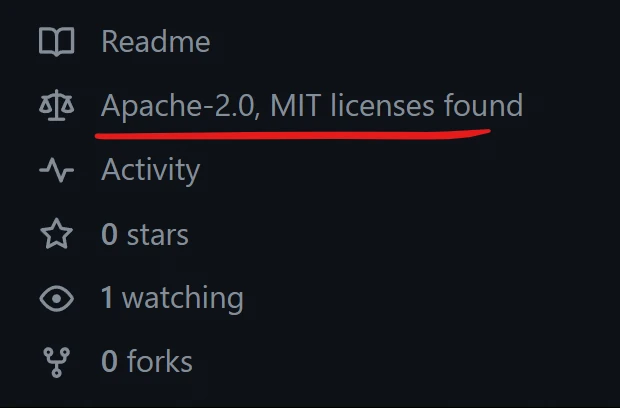
建议在代码仓库中的根目录创建两个文件: LICENSE-APACHE 和 LICENSE-MIT.
GitHub 会根据文件名来识别当前代码仓库的 License.
借助 cargo-msrv 获取 MSRV
在开发 lib 时, 应当标明 MSRV (Minimum Supported Rust Version).
但问题是: 如何找到当前 package 所支持的 MSRV? 此时可以借助 cargo-msrv.
(通过官方文档中的任意方式安装 cargo-msrv, 这里略过安装步骤, 只记录用法).
cargo msrv find # 寻找 MSRV (等待时间长, 不推荐使用)
cargo msrv find --min 1.79.0  # 从 1.79.0 开始寻找 MSRV
cargo msrv list # 列出所依赖的 crate 的 MSRV
cargo msrv verify # 验证 Cargo.toml 中的 rust-version 是否无冲突
TIP
建议首先通过 cargo msrv list 来找出所依赖的 crate 的最大 MSRV,
并以此为依据, 设置上面的 --min 选项的值, 以此加快寻找 MSRV 的速度.
避免杀毒软件对性能的影响
系统自带的杀毒软件 (例如 Windows Security) 可能会影响性能.
解决方案请参考 运维笔记 - 避免杀毒软件影响性能 部分.
使用 mold linker 加快编译速度
mold 是最快的开源 linker, 能用 mold 时应该使用.
(有的平台例如 window 不被 mold 支持, 就没法用).
在操作系统内安装好 mold 之后, 在 rust 工程中做配置:
# .cargo/config.toml
[target.x86_64-unknown-linux-gnu]
rustflags = ["-C", "link-arg=-fuse-ld=mold"]
为了检测是否真的使用了 mold 作为 linker, 可以借助以下命令做检查:
# 检测某个二进制文件编译时的信息 (包括 linker)
readelf -p .comment path/to/my/binary
# e.g. 常见的路径在工程根目录的 target 文件夹下
readelf -p .comment target/debug/demo
例如在下图中可以看到, 该二进制文件使用了 mold 作为 linker 来编译:

全局起效的 lint 推荐配置
默认情况下, 建议通过 Cargo.toml 来配置:
Cargo.toml 中的配置
# rustc lints (https://doc.rust-lang.org/rustc/lints/index.html)
[lints.rust]
# lint groups (https://doc.rust-lang.org/rustc/lints/groups.html)
rust-2024-compatibility = { level = "warn", priority = -1 }
future-incompatible = { level = "deny", priority = -1 }
deprecated-safe = { level = "deny", priority = -1 }
# lint listing (https://doc.rust-lang.org/rustc/lints/listing/index.html)
missing_debug_implementations = "deny"
unreachable_pub = "deny"
unsafe_code = "forbid"

# rustdoc lints (https://doc.rust-lang.org/rustdoc/lints.html)
[lints.rustdoc]
broken_intra_doc_links = "deny"
unescaped_backticks = "deny"

# clippy lints (https://rust-lang.github.io/rust-clippy/master/index.html)
[lints.clippy]
inefficient_to_string = "warn"
rest_pat_in_fully_bound_structs = "warn"
match_wildcard_for_single_variants = "warn"
fn_params_excessive_bools = "warn"
unnested_or_patterns = "warn"
verbose_file_reads = "warn"
uninlined_format_args = "warn"
needless_continue = "warn"
allow_attributes = "warn"
lossy_float_literal = "warn"
option_option = "warn"
macro_use_imports = "warn"
str_to_string = "warn"
match_on_vec_items = "warn"
suboptimal_flops = "warn"
enum_glob_use = "warn"
filter_map_next = "warn"
imprecise_flops = "warn"
unused_self = "warn"
empty_enum = "warn"
linkedlist = "warn"
mem_forget = "warn"
exit = "warn"
TIP
在 Cargo.toml 中配置的 lint 将会对整个 package 生效.
对于使用了 workspace 来管理的工程而言, 建议使用这种方式:
[workspace.lints.rust]
unreachable_pub = "deny"
unsafe_code = "forbid"
# ...[lints]
workspace = true对于需要根据某些条件 (cfg_attr) 配置的 lint, 只能写在 rust 代码中:
// rustc
#![cfg_attr(debug_assertions, allow(unused))]
#![cfg_attr(not(debug_assertions), deny(missing_docs))]
#![cfg_attr(not(debug_assertions), deny(clippy::unwrap_used))]
#![cfg_attr(not(debug_assertions), deny(warnings))]
// clippy
#![cfg_attr(not(debug_assertions), deny(clippy::todo))]
#![cfg_attr(
    not(any(test, debug_assertions)),
    deny(clippy::print_stdout, clippy::dbg_macro)
)]
TIP
需要注意代码中的配置的生效范围仅限于 其所在的 crate (而非 package 这一层).
例如位于 src/bin/, tests/, examples/ 等路径下的代码, 都分属不同 crate.
隐式与显式的 feature
当我们在 dependencies 中使用 optional = true 时, 会自动生成相应的 feature.
[dependencies]
serde = { version = "1.0.196", optional = true }

# 相当于隐式生成以下两行
[features]
serde = ["dep:serde"]
有些时候, 我们可能希望将多个 optional crate 组合起来作为某个 feature 的依赖.
此时就不能使用 "隐式" 的 feature, 需要 "显式" 地写出来, 此时需要用到 dep:xxx 这样的写法.
例如为了处理 AVIF 格式的图片, 需要依赖 ravif 和 rgb 这两个 crate.
我们希望能通过名为 avif 的 feature, 来同时启用或禁用所依赖的 crate:
[dependencies]
ravif = { version = "0.6.3", optional = true }
rgb = { version = "0.8.25", optional = true }

[features]
avif = ["dep:ravif", "dep:rgb"]
TIP
当 optional crate 被显式依赖时, 就 不会 隐式生成同名的 feature.
例如上面这种情况下, 不会隐式生成名为 ravif 和 rgb 的 feature.
我们可以通过 cargo 的命令选项来自动添加 optional crate:
cargo add [CRATE_NAME] --optional缩小可执行程序的体积
什么时候可能会希望缩小编译出来的可执行程序体积?
如果目标平台是 wasm, 或是需要让程序运行才嵌入式设备上.
为此可以在 Cargo.toml 中做如下配置:
[profile.release]
# rustc supports two "optimize for size" levels:  opt-level = "s" and "z".
# These names were inherited from clang / LLVM and are not too descriptive
# but "z" is meant to give the idea that it produces smaller binaries than "s".
# https://docs.rust-embedded.org/book/unsorted/speed-vs-size.html#optimize-for-size
opt-level = "z"

# by compiling as a single codegen unit (i.e. not in parallel),
# it's possible to reduce size even further at the expense of
# compilation time
codegen-units = 1

# by enabling link-time optimization, we can reduce size even further
# by telling cargo to optimize at the link stage (in addition to the
# normal optimizations during the compilation stage)
lto = true

# by overriding our dependencies' compilation settings, we can further optimize for size
# https://docs.rust-embedded.org/book/unsorted/speed-vs-size.html#optimizing-dependencies
[profile.release.package."*"]
codegen-units = 1
opt-level = "z"
另外如果目标平台是 wasm, 那么还可通过 wasm-opt 来进一步优化:
# 先将 binaryen 安装在开发环境中, 然后执行以下命令
wasm-opt -Os --output output.wasm input.wasm # 优化级别为 s
wasm-opt -Oz --output output.wasm input.wasm # 优化级别为 z